Ask before explaining
Our defender pinches. Who covers behind?
Reveal coaching answer
The high forward fills the vacated lane. Another teammate must replace high cover before you join low.
WEEK 11 • SCAN — SUPPORT — COMPETE
Find the support player. Predict the next job. Watch what changes.
Before the puck changes hands, find who protects the middle. After it changes, name that player’s next job.
Each lesson is a 44-second captioned video. Watch together, pause for a player answer, then compare the read. No audio is required.
Lesson 1 • OFFENSIVE ZONE
Support above. Read before you go.
Our defender pinches. Who covers behind?
The high forward fills the vacated lane. Another teammate must replace high cover before you join low.
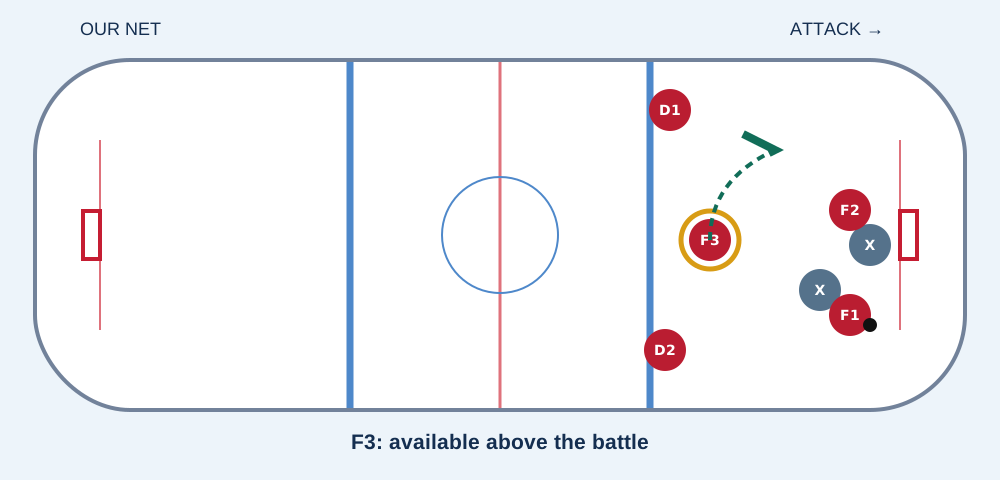
Gold ring: key support. Red: our team. X: opponents. Black dot: puck. Green route: suggested recovery. F3 means a changing role, not one permanent player.
The application window at 0:27–0:37 uses the Fort Wayne source clip at 0:20–0:30. Find the support players and discuss their options; the clip does not demonstrate every diagram action.
Buffalo: F3 high and pinch coverage ↗
Opens Ice Hockey Systems. Use your membership if prompted. The lesson timestamps above belong to our captioned teaching video, not this external clip.
Lesson 2 • NEUTRAL ZONE
Get inside. Read puck and threats.
We lose it. What lane do I recover through?
Recover inside, toward our net and the threat. Keep moving; use your stick to remove the next passing option.
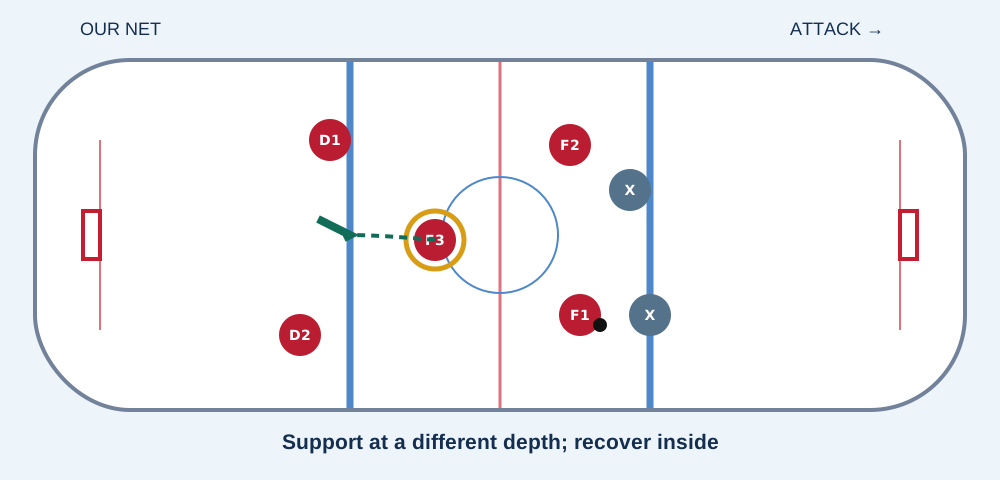
Gold ring: key support. Red: our team. X: opponents. Black dot: puck. Green route: suggested recovery. F3 means a changing role, not one permanent player.
The application window at 0:27–0:37 uses the Fort Wayne source clip at 0:14–0:20. Find the support players and discuss their options; the clip does not demonstrate every diagram action. The final frame holds briefly for discussion.
Landeskog: reload and track inside the dots ↗
Opens Ice Hockey Systems. Use your membership if prompted. The lesson timestamps above belong to our captioned teaching video, not this external clip.
Lesson 3 • DEFENSIVE ZONE
Pressure with support. Protect our net.
Our first defender is beaten. Who helps?
The inside layer helps; net-front cover stays. On a recovery, become outlets. Do not leave before control.
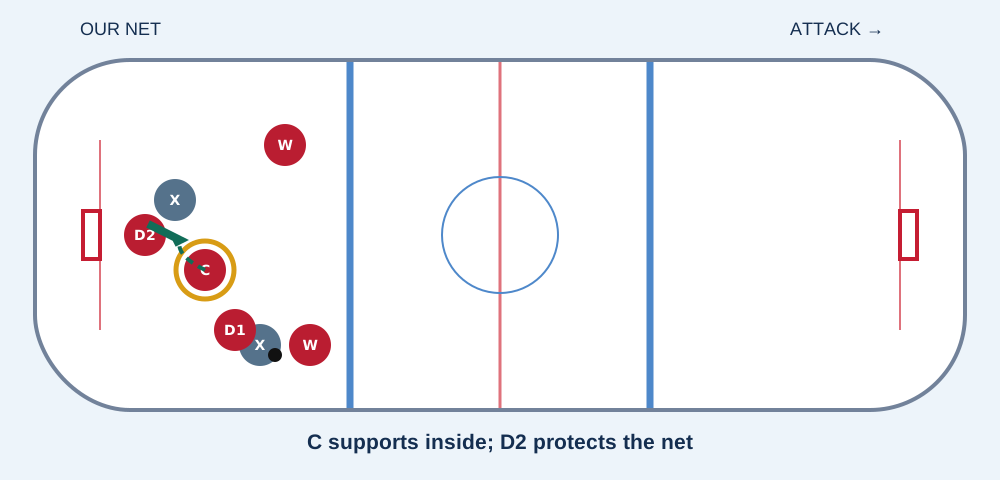
Gold ring: key support. Red: our team. X: opponents. Black dot: puck. Green route: suggested recovery. F3 means a changing role, not one permanent player.
The application window at 0:27–0:37 uses the Fort Wayne source clip at 0:06–0:14. Find the support players and discuss their options; the clip does not demonstrate every diagram action. The final frame holds briefly for discussion.
Minnesota: defensive layers and exit support ↗
Opens Ice Hockey Systems. Use your membership if prompted. The lesson timestamps above belong to our captioned teaching video, not this external clip.
Defensive-zone detail: Above the puck does not mean abandoning the net to skate toward the blue line. Stay on the defensive side of the threat, support inside and keep net-front coverage.
Sources & references for our learning resources →
Opening, 45 seconds: “Our adjustment in Game 2 was above the puck. Good support helps us attack again.” Explain the mission and point out our net.
About two minutes per lesson: Watch the situation, pause before the answer, let a player point and predict, then show the diagram response and team application. Finish each with “What changed? What is your next job?”
Closing, 30–60 seconds: Ask three players for one action each: support above the attack; recover inside; support the battle while protecting the net.
On the ice: Keep the play alive after a shot, recovery or turnover. Observe the same player changing jobs. Use brief questions, then replay the problem.
This instructional sequence is Coach Faulkner’s North Stars adaptation. The references support the teaching approach; they do not prescribe one shared national system. IHS clip selection is based on its published coaching descriptions; external action timestamps are not asserted.